Take-away: We see concepts (for example, we see a “car”) not a combination of shapes and values in space. To draw well, we first have to learn to see the world objectively.
If you’re new to drawing, you got a huge challenge in front of you. It’s one that you haven’t noticed yet: nothing looks like what you think it looks like!
I drew these two sketches using shapes and forms. If you zoom in, you’ll see that there’s no distinct finger or eye drawn.
When we see a human face, our brain processes it quickly. We pick up the most subtle changes and tell apart the hundreds of people we see in our daily life. While we can tell them apart and recognize them by all their differences, we can’t draw them just like that. Why not? We know them. We remember them. Otherwise we couldn’t tell who’s John and who’s Josh!
The problem has to do with brain processing. In art, beginners draw what they think an eye looks like, instead of the eye they see in front of them. There is so much visual information around us at any given time, that it would be impossible for our brains to process it all. Instead, our brains simplify all that input.
A beginner typically gets stuck on symbol drawing. That’s when you draw what you know instead of drawing the objective shapes and angles that you actually see. You think you recognize a nose by all its little shapes, but your brain just takes it as a whole, labels it “nose” and tells you not to worry about the little details. Heck, your brain doesn’t only do that with little parts like a nose, but with anything!
For example, did you know that you read words, you don’t read letters?
Case in point: the huamn mnid deos not raed ervey ltteer by istlef, but the wrod as a wlohe. Aaznmig, huh? (Example by Darius Ilgunas, from Proven Strategies to Succeed at School)
Optical illusions exploit that:
In that classic optical illusion, the black square (A) in the light looks darker than the white square (B) in the shadow. Why? Because we already divided what we see into “dark squares” and “light”. The light square looks light and the dark square looks dark, because our brain decided that.
Seeing the world in context means we don’t see the physical world exactly as it is.
If we could see the world objectively, we wouldn’t fall for optical illusions. But we’d also need a lot of brain power to figure out anything. Imagine suffering in the hot sun at a bus stop. You want to stand in the shade. But since you see everything objectively without context, now you have to observe the pavement you’re standing on right now, calculate the brightness of 200 color specks and then compare that to the average color brightness of a spot of pavement a few feet further, before you decide whether there’s shade over there. Oh, and before doing that, do a quick calculation to determine where your own shadow falls on the pavement, so you don’t mistake that color gradient change for some shade.
Our brain simplifies the world, or it would be too difficult to make decisions and take action.
That’s why we can immediately tell when a face is mangled. Yet to draw a face… For that, we first have to study the proportions of a face – an ear is 1/3 of a face, the eyes are approximately halfway, etc. There’s a gap between subconscious and conscious knowledge that our brain uses for survival. We have to close that gap to become better artists. We don’t see the world as it is. We see symbols and concepts.
Another example where symbol drawing shows up is Foreshortening. Foreshortening is such a challenge. Foreshortening is when the perspective compresses something long into a small space.
Usually we blunder with foreshortened limbs. We know arms are long. We know legs are long. So we draw them long instead of drawing them accurately.
While symbol drawing can reduce the accuracy of your art, it can be used as a helpful trick too: Symbol drawing on youtube
That video gives you a fun party trick, but it doesn’t teach professional drawing skill. What is your personal goal? If you want to draw backgrounds and action scenes, that trick might not be enough. Even if you only want to draw your Dungeons & Dragons party character headshots, it might not be enough.
Knowing your drawing goals can help you decide what tools to add to your toolbox. Learning to see shapes and angles is a good tool for almost any goal. Symbol drawing keeps you limited to the symbols your brain can recall.
When an artwork is in the public domain, anyone can use it for any purpose. Since copyrights expire, eventually all art becomes public domain.
Why Put Your Art in the Public Domain?
I can’t think of a good reason to do that.
Once in the public domain, you don’t own the art anymore. If someone else gets filthy wealthy by selling t-shirts with your art, you don’t get a cut of the profits. Trolls can make obscene derivatives – maybe your furry OC will become the mascot of the next Nazi rally and you’d be out of luck stopping them.
So why did I do it? I use public domain images a lot, so I’m just giving back for good karma? It’s a feel-good reason. The downsides I mentioned are the same reason you might want to contribute – give resources to others and expect nothing back.
How Do You Publish Your Art to the Public Domain?
If you want to be all prim and proper, you get an attorney and sign a deed to release your art to the Public Domain. That’s a bit much. How did I go about it? I just uploaded the art pieces to WikiMedia Commons with a CC0 1.0 license (= release into the public domain). Say I change my mind & decide to sue someone. The defendant can simply show the WikiMedia with the CC0 1.0 to the judge. Or show this blog post…
Am I going to convince the judge that user “IrisHopp” on WikiMedia wasn’t me?
It’s not a signed deed drafted by an attorney and sanctioned by the courts, but it’s functionally the same. Both approaches make sure you lose in court if you try to claim copyright infringement! So why not go for the easy-peasy option?
Here’s a link to all my free-to-use images uploaded to Wikimedia: Iris Hopp uploads on Wikimedia. In this blog post, some images are resized, so you can also check out the WikiMedia page for a larger version.
Here Are The Images I Have In The Public Domain Right Now:
1. First, Two Flowers
This one is so forgettable I don’t even remember why or when I made it.
If I had to guess it was just a quick warm-up study. Ironically, it’s so forgettable and so not special, and so boring yet it’s at number one because out of all the images I’ve uploaded the public domain this might be the only one that is actually useful. I’ll talk more about that at the end of this post.
2. A Hopeful Orca
Orca – Hope In Dark Times
This Orca is special too. If you’ve read my blog posts, you’ll know that I’ve been struggling the past years due to traumatic life experiences. I have even been officially diagnosed with PTSD.
I’m not back on my feet yet but still working towards it.
This Orca was a little bit of Hope in Dark Times because my skills have gotten really rusty over the past years due to not consistently drawing.
I know, I know, “Life happens. Keep drawing.”
Well I didn’t.
One of the hardest parts of getting back into drawing is that constant feeling of defeat. Every minute of drawing is a confrontation. It’s rubbed in your face that you’ve lost a lot of your skill, you’ve fallen behind your peers, and you have to rebuild all that before you can even start again.
It’s pretty crazy when I see someone post their work done for an AAA title and I’m considering to take on $150 DND commissions.
Okay, back on to the Orca. I was on a call on which a drawing mentor of mine and I just doodled this one. It came out exactly what you see here on your screen.
It was nice to see that I can just spontaneously do something that doesn’t look like shit.
Besides the flowers, this might be the second image that actually has some value for people besides me. I could see it work on a t-shirt, a store or I could see someone refine the design to use it as a sticker or logo.
3. Portraits of Horses
The horses are a collection of three studies. The big horse face portrait took an hour and the two small ones took 30 minutes each.
I don’t have the reference images right now, so I cannot credit the original photographers. The paintings have been purposefully changed enough that there is no copyright infringement in sharing this. For example, the horse portrait on the left is an Akhal Teke horse that has no mane visible in the original picture.
The right horse is a screenshot from a video about mustangs, and I changed the general look of the horse. And for the bottom right picture, I adjusted the pose of the horse.
I’ll come across a reference images sometime when I organize my hard drive files and at that time I will add them to this blog post.
4. Lion Post Card
The first picture was my stopping point, but I went back the next day and added some details to make this painting pop!
It turned out pretty good, given that I don’t have experience with traditional painting. At FZD I learned digital painting and for work it’s always digital too.
I wanted to create a cool postcard, wasn’t sure what to paint but I like lions, so this was the end result.
5. Kitsch Flowers Painted While LARPing
This flower painting is only in the list because I didn’t feel like getting my hard drive and looking through thousands and thousands of drawings and paintings I’ve made in the past. The few images uploaded to the public domain are actually limited to what I happened to have on my laptop.
This flower was a fun one to draw during the pandemic lockdown in 2020. I joined LARP online sessions, and in one of the sessions we infiltrated a painters’ guild. In the role-playing scenario, our characters had to do a 5-minute art challenge. I got this picture of some flowers as my art challenge:
Google says it is a painting by Myroslava Voloschuk from Ukraine, but that name doesn’t match the right bottom signature.
I did set up timer for 4 minutes, but I didn’t hear it go off. So I’m not sure if I actually did that in 5 minutes and 30 seconds. Maybe I cheated by accident? Anyway, this was my 5-minute speed paint attempt at recreating the reference image:
The next session we had, I kept painting it little by little while multitasking with the chat and continuing the LARP scenario. Yes, I changed it from Magnolia flowers into some undetermined other floral species. I wanted it to look more decadent…
Here’s the sped up video:
I never finished it. It’s been more than a year now. I wanted to make a super bling bling and kitsch version from the original modest reference image, but that’s not going to happen. Let’s call it done and add it here.
Fun fact, I did find the original reference photograph by SpadeCaller (Matthew Schwartz) for the original painting. Here’s all of the work in a mini slide-show:
6. Artsy Fartsy World Map
I suck at anything “graphic design”, OK? This is my best attempt at creating a pretty map… I can only think of this being useful for folks who who’d put this on their wall to color in the countries they’ve been to.
User /u/asdasasdass321 on Reddit’s /r/MapPorn warned against using it because of all the mistakes I made:
So there you go. Uploading it to WikiMedia is probably the equivalent of bringing trash to Goodwill…
7. Lion Sketch
A lion sketch. That’s all it is.
8-9-10. The Beetle Cab
This is a series of three images that I made back in FZD, for a homework project. It’s still my favorite design out of everything I’ve made.
I enjoy nerding out, so I had a lot of fun figuring out small details like:
“Would a whip still work when they have a hard exoskeleton?”
Answer: At the time I thought no, so I added bells. Nowadays, I think the giant horse-beetles would feel it.
or…
“Would the shape of a beetle’s head change if it was as tall as a horse?”
Answer: Yes, their face would elongate so their eyes can still stick out above the grass while they graze. Gotta spot those predators!
I did a lot of research (biology, historical vehicles, …) and had a lot of fun. Fun shows up in the small details, like when you zoom in on the newspaper excerpt:
I am actually using Beetle-Cab as an example in an blog post about having fun! Coming “soon” (so mid 2025 maybe?).
Frankly, this one hurts to put in the Public Domain because I’m so attached to it. These are stupid, silly feelings! Beetle-Cab is so niche and nerdy that I don’t see anyone using it… ever! The two flowers at number #1 are uninspired, but they have the highest chance of being useful to someone. Boring is often useful. Crazy has fewer real life applications.
As part of the Beetle Cab series, I painted a family in their living room.
Quick update. I’m not doing well and at the same time I’m doing fantastic given the circumstances.
There is an ongoing court case, so I cannot share any details currently. I’m a victim of violence. I rather call myself “that gal who escaped” instead of “crime victim”, but hey, it works for the courts.
My mental and physical health are recovering. Drawing/painting is hard right now. I’m rusty. My brain is mushy and my hands don’t remember how to hold a pencil.
Sketches made today.
The worst is the mental battle. The following emotions are nicking my productivity:
-Stress. It’s hard to focus. -Guilt. Guilt for axing a project because I was in the hospital. Are emotions supposed to make sense? -Shame. My output is low and the quality even lower.
It has become a catch-22.
It’s about gaining momentum. You need to get the shitty drawings out to get to the good ones. And yet… instead of going through 60 design so I can end up with something decent for my client, I don’t even pick up my pen. I don’t want to confront those 60 bad designs.
This is “external perfectionism”.
It gets extreme. I thought about abandoning my dream career, just so I didn’t have to re-learn my old skills. This is not about drawing or painting. It’s the emotional pain of losing my previous skill level. It’s the hurt pride of stepping back from my favorite projects to focus on easier projects.
It’s all a mental battle now. I do not want to accept my regression in skill and productivity, but avoiding the confrontation extends the battle. The exact same shows up in my physical therapy. Going for a 5-mile run against doctor’s orders? I’m up for that. Small exercises that will help me walk pain-free in the future? No thanks.
It’s just ego. I don’t want to suck.
But dreaming about being great doesn’t get you there. You gotta draw.
Summary: personal post about $$. I thought August would become my highest earning month, but after a series of misevents, I only got +$631,26. Ouch!
Life happens. Keep drawing. Make sure to have some cash buffer.
Rejected sketch for Aviary Games, Alchemy!
August was… interesting. I got some bad luck, gave away a bunch of discounts and the biggest invoice out there doesn’t have to be paid for another four months. I’m sure you’ve heard about the ups and downs of freelancing. My August earnings make for a good example of that!
Is this turning into a “doom and gloom” blog yet? I’ll make sure to be more positive in the next post.
First of all, I only had ~65 hours of pen to paper this month. Nope, that’s not the hours per week, that’s all the hours for all of August… of personal drawings and work combined.
1. Personal life getting in the way of drawing
What happened? Personal injuries! The main one is a shoulder dislocation (…again).
I’ve got a very crappy shoulder, messed up by a doctor back in 2008. So I sat down to draw, stretched my arms and my shoulder popped out. After getting it back in, I passed out for an hour and then went to get ibuprofen. Ibuprofen is unintentionally becoming my staple food! The pain and reduced mobility lasted a while.
I’ve also hurt some other body parts but technically only the shoulder held me back from drawing. Except for the coffee maybe, because I had to clean the floor, desk, electronics, chair, etc. Guys, I managed to get second degree burns from spilling coffee. Who the heck does that?
Then we had lots of moving around – long story short, no US green card so I hopped back to Belgium. I heard something about the president not liking illegal immigrants? It being tourist season and me not booking beforehand, I had to switch locations often. For September, I’m skipping that hassle and am staying at my parents’ place.
Lastly, I also had 10 days scheduled as vacation time because I hadn’t seen my husband in 3 months More bad luck: flight delays! Lost luggage! Both of those took a good chunk of my time. Here’s me drawing while queuing:
With grumpy ladies driving their cart in your back and no power nearby, 10 minute sketches take a whole lot longer…
Now this is important: I also procrastinated. I can give an array of excuses – tired from juggling the moving around and physical injuries, burned out from trying to start a second business and commodity trading, … But it’s simple: I have procrastinated. Just like you, I have 100% control over my actions and sometimes I choose to browse the interwebs or play WoW.
Life happens. Keep drawing.
So that’s it for my personal side.
2. Clients getting in the way of other clients
Now onto the client side.
At the beginning of August, I thought this would be my best earning month! What’s the end result? About $600 arrived in my bank account. To be fair, there are still 2 unpaid invoices for a total of €1.646,64 ($1.953,66). I only look at money that’s been paid already, because you never know what’s gonna come in between you and those unpaid invoices. You can agree or disagree, but I don’t have that money so I won’t count it as earnings.
August started with 6 projects lined up, spanning until the month of October. First of all, the biggest project (5 figures!!) got cancelled and postponed to January. A different project moved it’s deadline from September to early August, so I had to push back the others.
With everything under control again and me at the airport ready for a 10-day leave, a client replied to me: “What about the other drawings from the document?”.
What document? Uh-oh.
Turned out I had another 42 drawings lined up that I did not know about. Due date? The day before.
That was fun! Another round of pushing more clients back and cramming in an airline seat:
In the end, I made 53 drawings during my holiday.
Late deadline? The Client gets a DISCOUNT
The clients that are pushed back get a discount from me, usually that’s 20% to 30%. This time, I went up to a 60% discount. Yes, quite a pay cut for me.
It’s worth it in the long run. I screwed up. The client is not responsible for my shoulder dislocation or another client moving his deadlines. By me taking the burden, I hope to maintain a long-term relationship. Update a few years later: I’ve had a client re-hire me despite missing the deadline for his first project, so looks like taking ownership of my failings did leave a good impression!
The “whoops, there’s 50+ more drawings”-project has cost me money due to those discounts, and its invoices are only due by 2018/01/01. Since it’s the first time working with this client, I have no idea whether they’ll pay next month or the very last day of December. So that’s $1.953,66 just floating in the ether right now.
The clients that did pay, all went through Paypal. After Paypal taking a ~5% cut from me I had +$631,26.
This is still pre-tax. My business is located in Belgium, a country pretty crazy about taxes (for example: you pay a “tourist tax” for staying in a hotel, separate from the taxes already included in your room price).
Freelancing? Get some savings first and keep a cash buffer.
$631,26 could be pretty awesome depending on which country you live in. It was not that awesome for me. My flight tickets alone were $2300. Freelancing has expenses, some small like paying for a custom domain (I grabbed irishopp.com), some big like a laptop/pc, software and tablets.
So get an emergency fund. Usually 3 months of buffer is fine, but for a freelancing artist… 6 months of living expenses sounds better. I drew on it heavily this month, and earlier I’ve needed it to buy an emergency computer ($1000) when my laptop refused to cooperate and to pay an unexpected hospital bill ($1900).
The post ends here. I’m just adding an overview of earnings below, including non-art experiments.
Art
Crop of a card for Aviary Games, Alchemy!
Mentorship: +$123,09
Illustration: +$107,25
Concept Art: +$400,92
Total: +$631,26
Internet Marketing
IM: -$154
Officially this is a new business, but it’s just an umbrella for everything I do online that involves money, like this blog, Reddit give-aways or writing articles. Regardless, it sits at a loss because I paid -$67 in wages and spent -$87.87 on the Reddit L2D give-away.
That was it for the ookiespooky cautionary tale. Happy drawing!
Now I never wanted to stop drawing. I tried it for a few weeks at a time, without my hand getting better, so I developed coping strategies instead. All of the below tips helped to:
1) keep drawing through the pain
2) stop increasing the damage
The damage reversed from the worst point, but never healed. So this is not a cure for carpal tunnel, this is more “living with” carpal tunnel.
It’s pricey at around $30, but I can wash it in the laundry & it’s still fine after more than a year.
I’m a huge fan. I tried a bunch of braces, splints, wrist bands and after comparing them: you gotta find a good one. Some braces didn’t have any effect on reducing pain.
You also gotta know how to use it. Put it on at night and sleep with your wrist brace, so your drawing hand recovers overnight.
Do not use it when drawing.That’s what I did at first and my symptoms got worse. Why? When you put a brace on, you’re enabling yourself to keep drawing when your wrist is about to give out. Your wrist doesn’t support itself anymore, so it atrophies. Lastly, you leave bad form unattended.
Sleeping with a wrist band also prevents tendonitis/carpal tunnel. 10/10 good method.
2. SHAKE IT OFF
My classmates got familiar with me doing this all the time:
I don’t know why, but shaking my hand like that soothes the pain for 12-15 seconds. I’ll take it. I still do it often and it just feels so good… a bit of relief in my wrist…
3. IBUPROFEN
I did go to the doctor a few weeks after the pain started. He prescribed me a bunch of pills and creams that had zero effect. I kept struggling, but thanks to having some injuries earlier in life, I knew a remedy.. So I went back and demanded an Ibuprofen prescription. Two weeks of ibuprofen lessened the pain quite a bit. I tried several times to push past the plateau, but it won’t budge. The ibuprofen was good to take me from the peak of a pain level that I’d call “bearable”.
Ibuprofen helps tendonitis, but not carpal tunnel.
That’s why I hit a plateau in recovery. The drugs fixed the tendonitis part, but couldn’t touch the carpal tunnel.
If you’re in the U.S., ibuprofen is an over the counter drug (you can even get it on Amazon, the US is crazy!). In most countries, it’s doctor prescription only. Ibuprofen damages your stomach, so don’t use it as a crutch. Try it for two weeks, see if you get improvement, get off it as soon as your recovery hits a plateau.
4. DROP THE PEN
So I had a few symptoms, tingling (still have that), throbbing pain, movement pain, blahblahblah, but the really bad ones were these sharp stings that I would get. Suddenly this flash of intense pain shooting through my hand… I winced whenever it happened, but carried on. Then I tried something: whenever I’d feel that zinger of pain, I would literally drop my pen. Sting, stop, drop. Wait a little, maybe do that hand-shake again. Continue.
I don’t know why but the very day I started doing that, my pain was improving.
5. NO PAIN KILLERS
Okay, I got a string opinion on this. The only time you take pain killers is when you can’t fall asleep due to pain. Eh, and during surgery maybe.
Pain is a warning signal. If you mute the signal, next time you draw beyond the breaking point and mess up everything beyond repair. Byebye drawing career (seriously, the fear of losing my future as an artist was worse than dealing with the pain!).
Keep this in mind when you take ibuprofen – ibuprofen is anti-inflammatory but it’s also a pain killer.
6. USE YOUR NON-DOMINANT HAND for everything else.
Use your other hand for the touchpad, mouse, typing, for using your fork, carrying stuff and opening doors. For brushing your teeth, for opening bottles, for picking your nose. Just don’t wear out your sore hand more than necessary.
This set-up is so essential that I’ll make a separate post about it. But in short:
– Put paper on the tablet. With the extra grip, you can relax your wrist without the pen slipping.
– (not visible in picture): socks taped around the pen, so I don’t have to bend my fingers all the way.
– bandage tying the pen to my hand, so I don’t have to use force to hold the pen. Also helps keeping my wrist straight.
8. DON’T STRETCH OR EXERCISE (until after it heals)
Holy damn, stretching hurts and knocks my hand out for a while. Stretching is good to prevent carpal tunnel, not heal it. It’s like exercise. Exercise is great to strengthen your muscles and prevent injury, but doing weightlifting with torn shoulder muscles is gonna mess ya up. Let ‘m heal, get back to stretching when you’re better.
How am I doing now?
It’s the two year anniversary of my wrist pain! 😀
Yup, still got daily pain. It is sooooo much better than the worst period though and I go through daily life without problems.
At this point in time, I still can’t do yoga or push-ups unless I use my fists instead of flat hands. I’m strong enough to starts strengthening my wrist again though, got some advice from a physical therapist and I’m doing targeted exercise occasionally. I do not think my carpal tunnel is gonna heal itself. But I can live with this. The happiness from drawing offsets the pain from my mild carpal tunnel. It offsets any pain, actually. Draw or die. Ha! Jk, but I love drawing.
To close with, here’s two tips that other people use:
1. Heat pads. Keep your wrist warm. I would put my wrist on my laptop charger! Drop the pen replaced this coping method for me.
2. Massages. For me, massages caused more pain, but some folks report improvement. Try it and let me know.
I hope your wrist feels better after reading this!
Take-away: Don’t grip your pen tightly. Just don’t.
Reading time: 2 minutes.
Here is the story about how I lost my hand.
It all starts a few years ago, when I was holding my pen like this:
You see how I’m squeezing that thing?!
Oooh, drawing with a deathgrip. Guess what I got out of it? A lifelong injury! Well, maybe it’s still reversible but I don’t want to stop drawing to check. Three-week breaks from drawing have yielded no improvement at all.
Just two weeks after starting Art school, my hand and wrist were hurting. Every day it hurt a little bit more. It became difficult to hold my pen. Quickly, I stopped pinching by myself because it hurt too much. But then it became painful to just hold a pen. Or to hold anything, really.
At the height of my pain, I was in so much pain that I couldn’t bend my fingers.
So like all sane people and aspiring artists, I kept drawing.
First I tried rubber bands to tie my pen to my hand, but they cut off blood flow. I started using tape, sticking the pen through my wrist brace, tying it with scraps of cloth, ….
A few weeks later I found a working technique:
Yup, I used a bandage to wrap my pen onto my hand and that’s how I kept on drawing.
Holy damn, do you need your hand a lot. Losing functionality in my right hand, I had trouble with:
Opening doors, using chopsticks, shuffling cards, carrying anything, opening bottles, writing, using your smartphone, mouse/touchpad,
Some of my homework that had teardrops on it. I learned to hide those stains by scanning, upping contrast and submitting the print.
Here’s my class notes before and after pain in my hand:
Guess which one is before and which one is after hand/wrist pain.
But at least I finished school.
What’s the point of this post? Am I looking for pity for my broken hand? Am I encouraging you to draw through the pain?
Nah, man, that’s silly.
I’m telling you DON’T PINCH YOUR PEN. Just learn to hold your pen correctly. You can avoid all of my pain ’n suffering. If this little story doesn’t convince you it’s important, then I… eh… well, you do you.
When you draw a non-living object from real life, you’re making a still life. Think of all those old paintings of flowers and fruit bowls – those are still lifes. We will start very simple, with just one single object.
Good objects to pick for your first time are organics, like a bell pepper or a banana. Why? When you draw a banana and you make it a bit too thick or too small, then your drawing will still look like a banana. Now if you pick a glass or keyboard for your first attempt, then you have all that cumbersome geometry and symmetry. Draw it wrong? Now it looks broken. So it’s easier to avoid man-made objects in the beginning.
Here’s a good list to choose from:
My #1 recommendation: plant/tree leaves. Easy to find, beautiful curves and super-forgiving to draw.
plant or tree leaves (ivy is fun to draw!)
veggies: a bell pepper, a pumpkin
non-round fruit like a banana or a pear
a banana peel
eaten apple core (a fresh apple is a tad too symmetrical)
small bones (why would you have that laying around though?)
If you don’t have any fruit or veggies laying around and not a single plant growing in your neighbourhood, then you can pick anything close to you. Don’t worry about finding the perfect beginner’s still life. It’s more important to start practicingtoday.
2. Why do we draw Still Lifes?
So why do we do still lifes? Our goal is to translate 3D-forms from the real world to 2D-forms on your paper. You want to understand volume and 3D-shapes. This will help later for perspective, shading and so on. Still lifes train your eye and your brain in a different way than grid drawing does.
Grid drawing can form bad habits – such as not looking at your reference as a whole or becoming unable to estimate big shapes. That’s why you want to do still lifes together with drawing from photographs.
3. How to draw a Still Life
There are a lot of techniques to help still life drawing, for example creating a viewfinder. We’re not gonna look at that stuff now, this is a simple get-started walk-through.
So let’s draw!
Step 1: Draw the general shape softly (= sketching)
Step 2: Mark the details
Step 3: Draw in bold lines, correct the sketch lines when necessary
Step 4 (optional): Draw the outline of the shadow. Often the edge of the shadow is a bit fuzzy, so it’s an exercise in decision-making! 🙂
Shading your still life is optional. Do whatever is more fun to you! With time and space left-over, pick up your object and draw it a few more times from different angles.
Here’s my first page:
This was a year later:
Back then I didn’t draw everyday – so you can improve faster by putting in more hours.
4. How NOT to draw a still life
Drawing from a photo of a still life is NOT drawing a still life! It’s a photo study. You’re not training 3D to 2D, instead it’s a more advanced version of grid drawing or maybe a subject study.
However, you can apply what you learn from your still lifes to your photo studies. You will have a better understanding of volume, so you can figure out what is going on in a particular pictures.
If you have any more questions, leave a comment or mail me at aiai-iris@hotmail.com (personal email).
Take-away:by placing grids over photographs, you can compare the angle and length of shapes to straight lines. This helps you to draw it correctly.
Reading Time: 5min + 30min practice (each day)
I uploaded a lot of pictures for this post. Let me know if the page loads slowly, then I’ll move the extra pictures to an album on Imgur ^_^
1. What is Grid Drawing?
If you read part 1 of Your First Week of Drawing (you can find it here), then you know that we want to see the world as a combination of shapes and angles. But like learning to run, you first have to go through the phases of crawling and walking.
So we take the picture we want to draw and place a grid over it like this:
The paper we will draw on gets the same grid.
What does this do? Instead of having to abstract the whole horse’s head, you can now focus on just the shapes within one square. While drawing, you tackle square by square. It’s like taking little bites instead of cramming the whole cake in your mouth.
2. Demo – Exercise Example
You can follow along with me, or choose a different picture if you don’t like horses. The other pictures are at the end of this post under “Day 1” 🙂
Choose one that you like, print it out and start sketching!
STEP 1: First we look at intersections between the big shapes of the horse and the grid.
We look at the place where the horse shape crosses the line of the grid and try to estimate that location on the grid on our paper.
To help you estimate the correct location, ask yourself questions like “Is it halfway or less than halfway of the line?”
Make as many or as little as you want – when we continue drawing, you can always add more marks.
STEP 2: Now we have bunch of dots, we can look at the shape between them.
Take the ear for example. Inside the square, what does the shape look like between the marks that you made? Is it a curve or a straight line? Does it go down first or does it go up?
We can also add in an extra dot to estimate the tip of the ear. How far from the edges of the grid is it? Breaking it down into nothing but dots and lines, we’ve now drawn the ear!
Is this familiar to you? It’s like creating your own connect-the-dots drawing!
STEP 3: Just like the ear, we keep analyzing the shapes between different marks of the grid.
Little by little we outline the horse. For a difficult shape, you can first lightly sketch it or use a dotted line before committing to the final line.
Every part of the horse is just an abstract shape that we’re expressing with a line.
STEP 4:The most difficult shapes are those that flow through some empty space, like the halter of the horse. The technique is still the same. Compare to the edges of the grid. How far up does the line go? How curved is it?
It’s about done at this stage!
STEP 5: for the last step, you can clean up your lines and add in details. Experiment if you like, you’ll make thousands of drawings over your life time. If you experiment and you don’t like the result, you can always draw it again! And if you do like the result, you’re one step closer to creating your own drawing style.
It doesn’t have to be a perfect copy. If you look at my example for a long time, you’ll see spots where I’m off a bit or my line is not rounded enough and more details like that. But it looks like the horse in the picture, right?
So how did it go? Do you feel like you are better at seeing shapes objectively?
3. Why do we start with this exercise?
Grid drawing simplifies drawing. It breaks it up in small manageable chunks, exactly what we want as a beginner. When you look at the drawing square by square, you prevent your brain from going “Horse! Let’s symbol draw!“. Instead, the grid makes it a lot easier to see just shapes and lines.
This is easy! Can I draw with a grid forever?
Grid drawing is a temporary exercise, like riding a bicycle with safety wheels. Eventually, you will ditch the safety wheels and never look back.
You might encounter online backlash when posting your grid drawings. Why? If your drawing looks very good, but has a grid on it, people might bash you for it. That’s a compliment! See it as people telling you that you’re ahead of this stage already 🙂
We’re training your artist’s eye. Eventually, you’ll be able to abstract shapes so you can draw 3D-ideas with 2D-lines.
5. Getting Rid of The Grid
Grid drawing can teach you bad habits too. That’s why we’ll combine it with life drawing (this will be in part 3 of Your First Week of Drawing).
As we’re training your eye, we’ll slowly get rid of the grid. Like learning to walk, the first day is more like crawling. The whole picture is covered in squares!
By the end of the week, the only thing left will be a simple cross like this:
6. More Exercises
Below are extra references, sorted by day. You can also make your own grid drawings! Use a photo editing program that you have or a site like IMGonline. What you want to do is overlaying the two images.
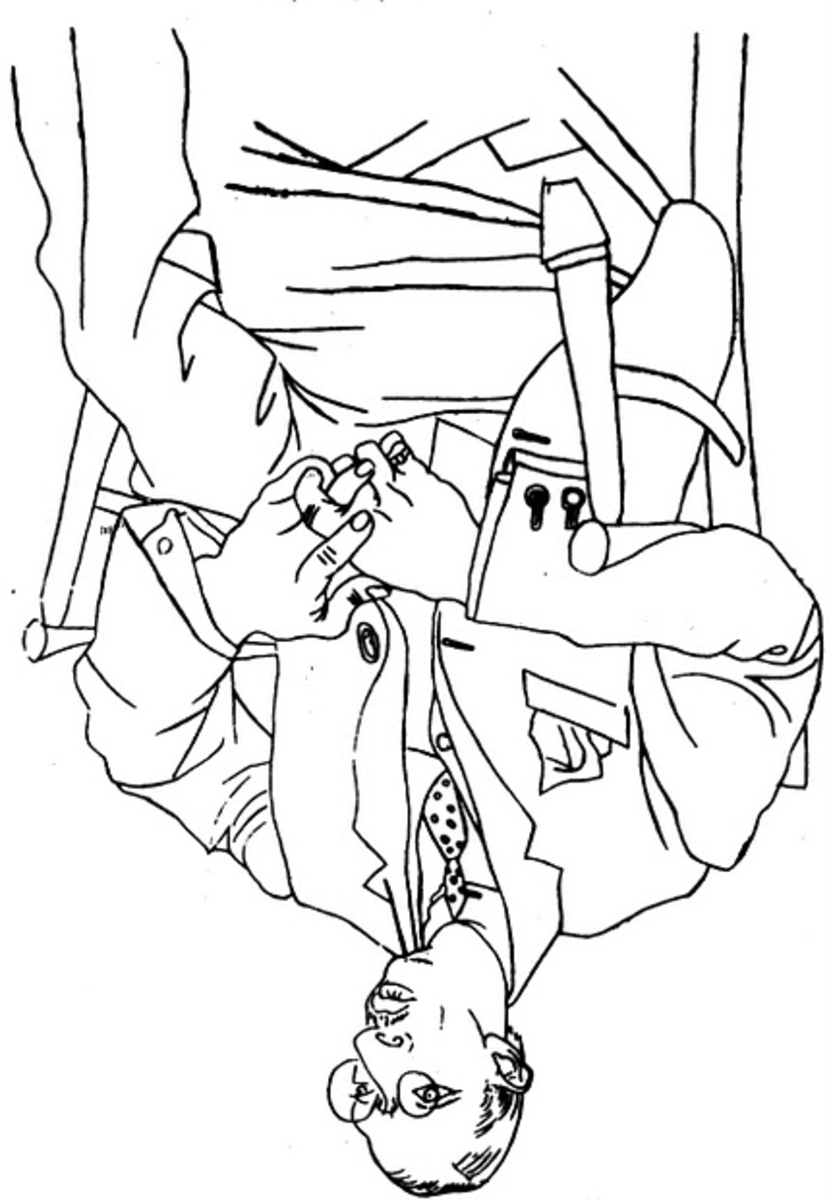
Take-away:If you’re new to drawing, the first thing you learn is seeing the world as shapes and angles. For your first exercise, draw this upside down picture. (link)
Reading-time: 4min + 20min of practice
Hey there!
New to drawing? Don’t know how to get started? When I started back in 2012, I spent two weeks worrying about “Where to begin?” and “How do I start drawing?“. So I decided to go back and solve the mystery for everyone else starting today. Just follow along!
Right now, grab a sheet of paper and a pencil and draw this picture:
Yes, just like that, upside down. Why? When you’re new to drawing, the first thing you have to learn is objectively seeing shapes and angles. When you turn it the right way round, you’ll be surprised to see how well you did!
If you’re not sure where to begin on the blank page in front of you: start with the upper left corner if you’re right-handed, or the upper right corner if you’re left-handed. Then work your way down. This way you avoid smearing the paper with your hand.
As an absolute beginner, you will be symbol drawing. You draw the idea of what you see instead of the physical shapes that you see. As a result, your drawing looks off.
Here’s an example of Absolute Beginner’s symbol drawing:
symbol drawing
The difference between what you see and what’s actually there can be pretty big. For example, your brain has symbols for what an eye looks like. Some kind of an oval with a circle in it, right? But is that what eyes really look like?
Reality is diverse. First of all, the shape of an eye changes by person. Then it also changes based on the angle you’re looking at it or the facial expression of the person! Every time you draw, you’ll have to look closely at what the shape actually is. This means fighting the pattern in your brain that’s trying to mislead you.
When you look at the below picture, the first you see is “a car”. Only when you concentrate, you’ll see the actual shapes it is made of.
A car is made of many different shapes – the shapes of the wheels, body of the car, reflections, windows and so on.
By flipping the Picasso drawing upside down, we force the brain to see lines instead of concepts. Now you’re no longer looking at a face, a hand or a mouth. It’s just a jumble of lines. Thanks to that, you draw a lot more accurately.
Your Picasso drawing doesn’t need critique or improvement – this exercise is about introducing you into looking at lines only.
The next steps will be drawing real-life objects and grid drawing.
3. Daily Practice
Do this one thing for me: sign your Picasso drawing with your first name. Now, next to that signature, write your name again but with your non-dominant hand (left hand for righties, right hand for lefties, mouth for ambidextrous folks).
What happened? One of the two signatures looks better than the other. Why? Your KNOWLEDGE is the same. You know how to hold a pen and you know how to write your name, so why the difference?
Well, your dominant hand has had a lot more PRACTICE writing your name. What I try to show is that knowledge is not enough. You will have to draw every day.
Mileage is king.
Try to look at your week. If you have a really bad day, when would you still find time for a quick doodle? Right after your wake up? Lunchtime? Before bed? Block that time slot for drawing. Just a minimum. If you can only do 20 minutes, do 20 minutes!
I suggest starting every drawing session with a 5-minute warm-up. The warm-up can be anything, just get your hand moving. Some draw lines and circles, others make funny doodles. Here’s some of my warm-up doodles:
You can just throw away the warm-up page afterwards, it’s purely for getting your blood flowing. This is not only a physical exercise. By making bold marks on the paper, you will feel more confident when you are starting your actual drawing afterwards.
4. Common Questions
The exercise took me longer than 20 minutes. Is that bad?
No, it doesn’t matter. Your speed will vary depending on how comfortable you are making lines. If you doodle a lot, you will draw it in 20 minutes. If you only use pen and paper for writing, or not even that, it might take you up two full hours! Do whatever is comfortable for you.
I started the exercise, but there’s no more room for his head on the page. Did I fail?
The exercise is about analysing lines, not drawing the whole picture. You did great!
Picasso was just the first step. Are you ready for more?
Here’s the short version of the next days: grab some simple objects like a banana, banana peel, tree leaf, lemon, stuffed animal, sock or tea bag. Every day, pick one, put it in front of you and draw it.
Combine this with drawing from photographs. For photographs, put a grid over the image and a grid over your sheet of paper, so you can work on the drawing one little square at a time.
Take-away: FZD is great for some and horrible for others. If being a concept artist is your number one life goal, FZD will be awesome. The teachers are helpful if you work first and ask questions second.
Reading Time: 4 minutes.
This is a FAQ of the questions I get asked most often about FZD. I also have a post about applying and getting into FZD. It doubles as a review of the school!
1. How did it work out for me?
The FZD program was great and I’m working freelance now (busy busy busy). Oh, I also got married to a fellow FZD student. Going to the school was the best decision ever!
My freelance stuff is a bunch of small jobs, I’m not comfortable yet. I’m also doing marketing art, product design and illustration besides concept art.
2. Will I have a job after going to FZD? Maybe.You do not have a guarantee of a job. It’s overall positive – fellow class mates get hired one by one. Even the student that was struggling the most got a job in-house.
But that’s not everyone. You’ll have to job hunt and keep crafting.
Feng told us that the average graduate has to apply 200 times before landing a good job. It seems a lot less, but maybe the average gets skewed by a few graduates having a hard time.
Creature design. FZD, term 02.
For me, without the school I would have 100% guarantee of unemployment (I tried to get commissions before FZD and landed a total of two times $20 bucks). At the moment of writing, I’ve got three ongoing projects. Prices: 1. open-ended illustration project, currently just crossed $1k. 2. a $500 product design project 3. a $750 illustration project
…I should be drawing instead of writing this post.
Anyway.
So yeah, the before-and-after is damn spectacular for me. But you see that it ain’t big bucks either. On top of that I hesitate to work hourly. I’m still slow.
3. What are classes like?
There’s a boatload to say about FZD. Have you read Alex Jessup’s post about his experience? Here’s an excerpt:
The workload is killer. What’s your studying style? Do you crunch and then crash or do you work with a steady daily schedule? People will brag about not sleeping, but then miss a full day when their body crashes. It could work for you, it might not.
The workload will be your strength when job hunting – being fast in delivering. Speed is still a weakness of mine, so I rely on communication as my personal strength.
4. Is it true that the teachers don’t help you?
Have you come across the angry internet guy hating on the teacher? I felt the opposite – everyone was so damn kind and helpful. Why the difference? You have to show effort first.
If you have questions, show the teacher your failed attempts. Be respectful, for example by arriving on time.
Two side notes:
People compare the school’s curriculum to Scott Robertson’s books (How to Draw & How to Render). Let me add some nuance: Scott Robertson is the theory, and FZD is the practice. The school showed me how to apply the techniques and then made me do a ton of exercises.
Teachers change frequently. At the moment, Feng doesn’t teach personally anymore. His replacement, Charles, is a splendid dude though.
5. Is FZD a good school? Is it the right school for me?
I had all those questions before going. Will it be worth it? Can I handle the work? Am I good enough?
To know whether you will fit in the school, just ask one thing. Is becoming a concept artist your number one life goal? Yup? Then you’re good. You can have doubts, worries and insecurities. It doesn’t matter. All you need is that drive that this is what you want. You would be unhappy and die full of regrets if you don’t pursue this in your lifetime. A burning inside telling you that you want to work the very hardest that you can. That does not mean being confident. That means being ready to fight despite feeling scared.
You doing your research is already a good sign. Some people were surprised to find out what the school was like!
Vehicle/Creature design. FZD, term 03.
How do you figure out whether you have that obsession? It keeps haunting you. Maybe it’s only a small voice. When it was necessary to focus on studying, work, life, … a voice kept nagging. Even when I didn’t draw for months, that voice never stopped reminding me that I wanted to draw. Every single day. I tried to push it away. Until I finally caved. There was no peace in my life without delving into concept art. That’s obsession.
The school was good for me – I had fun, made friends and it launched my career. At the same time, I don’t recommend the school or a concept art career to anyone. It’s so damn competitive. It will kill you if you don’t love it.


 Drawing from a photo of a still life is NOT drawing a still life! It’s a photo study. You’re not training 3D to 2D, instead it’s a more advanced version of grid drawing or maybe a subject study.


 Little by little we outline the horse. For a difficult shape, you can first lightly sketch it or use a dotted line before committing to the final line.


